Expense Tracker dApp
Description: The Expense Tracker dApp is a decentralized application that enables users to manage and monitor their personal finances on the aelf blockchain. It provides a user-friendly interface for recording expenses, categorizing them, and tracking spending habits, with all data securely stored and verified on the aelf blockchain.
Purpose: The purpose of the Expense Tracker dApp is to showcase the integration of personal finance management with blockchain technology, offering enhanced transparency and security for users' financial data. It serves as a practical example of decentralized applications in everyday use cases, while also providing a learning platform for smart contract development and blockchain-based financial solutions.
Difficulty Level: Moderate
Step 1 - Setting up your development environment
- Local
- Codespaces
- Basic knowledge of terminal commands
- IDE - Install VS Code
Note for Apple Silicon users:
Ensure that Rosetta is installed, if it is not, use the following command:
softwareupdate --install-rosetta
Install Required Packages
- Install dotnet 8.0.x SDK
- Install aelf contract templates
- Linux and macOs
- Windows
dotnet new --install AElf.ContractTemplates
dotnet new install AElf.ContractTemplates
AELF.ContractTemplates contains various predefined templates for the ease of developing smart contracts on the aelf blockchain.
- Install aelf deploy tool
dotnet tool install --global aelf.deploy
aelf.deploy is a utility tool for deploying smart contracts on the aelf blockchain. Please remember to export PATH after installing aelf.deploy.
ℹ️ Note: If you have installed aelf.deploy and your terminal says that there is no such command available, please uninstall and install aelf.deploy.
Install Node.js and Yarn
Install aelf-command
- Linux and macOs
- Windows
sudo npm i -g aelf-command
npm i -g aelf-command
aelf-command is a CLI tool for interacting with the aelf blockchain, enabling tasks like creating wallets and managing transactions. Provide required permissions while installing aelf-command globally.
- Visit aelf-devcontainer-template.
- Click the
Use this templatebutton. ChooseCreate a new repository. - Enter a suitable repository name. Click
Create repository. - Within the GitHub interface of your new repository, click on
Code. SelectCodespaces. - Click on the
+sign to create a new Codespace. - After some time, your workspace will load with the contents of the repository. You can now continue your development using GitHub Codespaces.
Step 2 - Develop Smart Contract
Start Your Smart Contract Project
-
Open your
Terminal. -
Enter the following command to generate a new project:
mkdir expense-tracker-dapp
cd expense-tracker-dapp
dotnet new aelf -n ExpenseTracker
Adding Your Smart Contract Code
Now that we have a template Expense Tracker project, we can customise the template to incorporate our own contract logic. Let's start by implementing methods to handle the basic functionality of adding an expense, updating a selected expense, deleting a selected expense, list all the expenses, and retrieves the details of a specific expense within the contract state. Expense tracker dApp includes the below functionalities like:
- AddExpense: Adds a new expense to the contract state.
- UpdateExpense: Updates an existing expense’s details such as description, category, amount, and currency.
- DeleteExpense: Deletes an expense based on the given expense ID.
- ListExpenses: Lists all expenses associated with a specific owner.
- GetExpense: Retrieves the details of a specific expense based on the provided expense ID.
- Enter this command in your
Terminal.
cd src
Defining Methods and Messages
- Rename the proto file name
hello_world_contract.protoinside folderProtobuf/contract/toexpense_tracker.proto:
mv Protobuf/contract/hello_world_contract.proto Protobuf/contract/expense_tracker.proto
The .proto file defines the structure and serialization of data, ensuring consistent communication and data exchange between the contract and external systems.
- Open the project with your IDE.
The implementation of expense_tracker.proto file inside folder src/Protobuf/contract/ is as follows:
syntax = "proto3";
import "aelf/options.proto";
import "google/protobuf/empty.proto";
import "google/protobuf/wrappers.proto";
import "Protobuf/reference/acs12.proto";
// The namespace of this class
option csharp_namespace = "AElf.Contracts.ExpenseTracker";
service ExpenseTracker {
  option (aelf.csharp_state) = "AElf.Contracts.ExpenseTracker.ExpenseTrackerState";
  option (aelf.base) = "Protobuf/reference/acs12.proto";
  rpc Initialize (google.protobuf.Empty) returns (google.protobuf.Empty) {
  }
  rpc AddExpense (ExpenseInput) returns (google.protobuf.StringValue) {
  }
  rpc UpdateExpense (ExpenseUpdateInput) returns (google.protobuf.Empty) {
  }
  rpc DeleteExpense (google.protobuf.StringValue) returns (google.protobuf.Empty) {
  }
  rpc ListExpenses (google.protobuf.StringValue) returns (ExpenseList) {
    option (aelf.is_view) = true;
  }
  rpc GetExpense (google.protobuf.StringValue) returns (Expense) {
    option (aelf.is_view) = true;
  }
  rpc GetInitialStatus (google.protobuf.Empty) returns (google.protobuf.BoolValue) {
    option (aelf.is_view) = true;
  }
}

message Expense {
  string expense_id = 1;
  string description = 2;
  string category = 3;
  int64 amount = 4; // Store as cents
  string currency = 5;
  string owner = 6;
  int64 created_at = 7;
  int64 updated_at = 8;
}

message ExpenseInput {
  string description = 1;
  string category = 2;
  int64 amount = 3; // Store as cents
  string currency = 4;
}

message ExpenseUpdateInput {
  string expense_id = 1;
  string description = 2;
  string category = 3;
  int64 amount = 4; // Store as cents
  string currency = 5;
}

message ExpenseList {
  repeated Expense expenses = 1;
}
rpcmethods define the callable functions within the contract, allowing external systems to interact with the contract's logic.messagerepresent the structured data exchanged between the contract and external systems.
Define Contract States
The implementation of the Expense Tracker smart contract state inside file src/ExpenseTrackerState.cs is as follows:
using AElf.Sdk.CSharp.State;
using AElf.Types;

namespace AElf.Contracts.ExpenseTracker
{
    public class ExpenseTrackerState : ContractState
    {
        public BoolState Initialized { get; set; }
        public SingletonState<Address> Owner { get; set; }
        public MappedState<string, Expense> Expenses { get; set; } // Mapping of expense ID to Expense
        public MappedState<string, bool> ExpenseExistence { get; set; } // Mapping to track expense existence
        public StringState ExpenseIds { get; set; } // Concatenated string of expense IDs
        public Int32State ExpenseCounter { get; set; } // Counter for generating unique IDs
    }
}
- The
State.csfile in the aelf blockchain smart contract holds the variables that store the contract's data, making sure this data is saved and accessible whenever the contract needs it.
Implement Expense Tracker Smart Contract
The implementation of the Expense Tracker smart contract inside file src/ExpenseTracker.cs is as follows:
using Google.Protobuf.WellKnownTypes;
using System.Collections.Generic;

namespace AElf.Contracts.ExpenseTracker
{
    public class ExpenseTracker : ExpenseTrackerContainer.ExpenseTrackerBase
    {
        public override Empty Initialize(Empty input)
        {
            if (State.Initialized.Value)
            {
                return new Empty();
            }
            State.Initialized.Value = true;
            State.Owner.Value = Context.Sender;
            State.ExpenseIds.Value = "";
            State.ExpenseCounter.Value = 0;
            return new Empty();
        }

        public override StringValue AddExpense(ExpenseInput input)
        {
            if (!State.Initialized.Value)
            {
                return new StringValue { Value = "Contract not initialized." };
            }
            var expenseId = (State.ExpenseCounter.Value + 1).ToString();
            State.ExpenseCounter.Value++;
            var timestamp = Context.CurrentBlockTime.Seconds;
            State.Expenses[expenseId] = new Expense
            {
                ExpenseId = expenseId,
                Description = input.Description,
                Category = input.Category,
                Amount = input.Amount, // Now using int64 for amount
                Currency = input.Currency,
                CreatedAt = timestamp,
                UpdatedAt = timestamp,
                Owner = Context.Sender.ToString().Trim('"'),
            };
            State.ExpenseExistence[expenseId] = true;

            var existingExpenseIds = State.ExpenseIds.Value;
            existingExpenseIds += string.IsNullOrEmpty(existingExpenseIds) ? expenseId : $",{expenseId}";
            State.ExpenseIds.Value = existingExpenseIds;

            return new StringValue { Value = expenseId };
        }

        public override Empty UpdateExpense(ExpenseUpdateInput input)
        {
            var expense = State.Expenses[input.ExpenseId];
            if (expense == null)
            {
                return new Empty(); // Handle case if expense doesn't exist
            }
            expense.Description = input.Description ?? expense.Description;
            expense.Category = input.Category ?? expense.Category;
            expense.Amount = input.Amount != 0 ? input.Amount : expense.Amount; // Now using int64 for amount
            expense.Currency = input.Currency ?? expense.Currency;
            expense.UpdatedAt = Context.CurrentBlockTime.Seconds;

            State.Expenses[input.ExpenseId] = expense;
            return new Empty();
        }

        public override Empty DeleteExpense(StringValue input)
        {
            State.Expenses.Remove(input.Value);
            State.ExpenseExistence.Remove(input.Value);

            var existingExpenseIds = State.ExpenseIds.Value.Split(',');
            var newExpenseIds = new List<string>(existingExpenseIds.Length);
            foreach (var expenseId in existingExpenseIds)
            {
                if (expenseId != input.Value)
                {
                    newExpenseIds.Add(expenseId);
                }
            }
            State.ExpenseIds.Value = string.Join(",", newExpenseIds);

            return new Empty();
        }

        public override ExpenseList ListExpenses(StringValue input)
        {
            var owner = input.Value; // Get the owner value from the input
            var expenseList = new ExpenseList();
            var expenseIds = State.ExpenseIds.Value.Split(',');
            foreach (var expenseId in expenseIds)
            {
                var expense = State.Expenses[expenseId];
                if (expense != null && expense.Owner == owner) // Filter expenses by owner
                {
                    expenseList.Expenses.Add(expense);
                }
            }
            return expenseList;
        }

        public override Expense GetExpense(StringValue input)
        {
            var expense = State.Expenses[input.Value];
            if (expense == null)
            {
                return new Expense { ExpenseId = input.Value, Description = "Expense not found." };
            }
            return expense;
        }

        public override BoolValue GetInitialStatus(Empty input)
        {
            return new BoolValue { Value = State.Initialized.Value };
        }
    }
}
Building Smart Contract
- Build the smart contract code with the following command inside
srcfolder:
dotnet build
You should see ExpenseTracker.dll.patched in the directory ExpenseTracker/src/bin/Debug/net.6.0
Step 3 - Deploy Smart Contract
Create A Wallet
To send transactions on the aelf blockchain, you must have a wallet.
- Run this command to create aelf wallet.
aelf-command create

- You will be prompted to save your account, please do save your account as shown below:
? Save account info into a file? (Y/n) Y
Make sure to choose Y to save your account information.
ℹ️ Note: If you do not save your account information (by selecting n or N), do not export the wallet password. Only proceed to the next step if you have saved your account information.
- Next, enter and confirm your password. Then export your wallet password as shown below:
- Linux and macOs
- Windows
export WALLET_PASSWORD="YOUR_WALLET_PASSWORD"
$env:WALLET_PASSWORD = "YOUR_WALLET_PASSWORD"
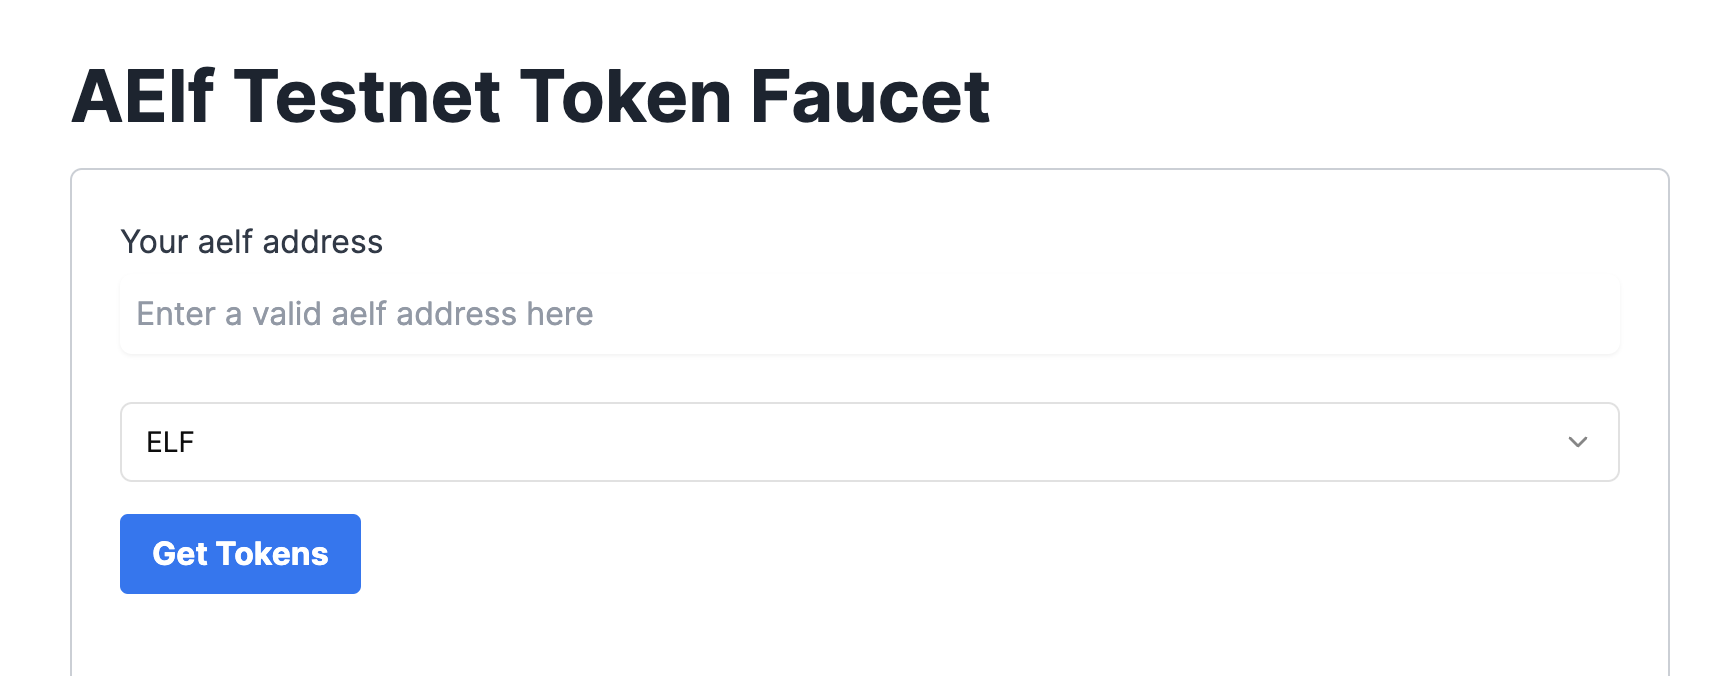
Acquire Testnet Tokens (Faucet) for Development
To deploy smart contracts or execute on-chain transactions on aelf, you'll require testnet ELF tokens.
Get ELF Tokens
Go to https://faucet-ui.aelf.dev Enter your address and click Get Tokens.
Deploy Smart Contract:
The smart contract needs to be deployed on the chain before users can interact with it.
Run the following command to deploy a contract. Remember to export the path of ExpenseTracker.dll.patched to CONTRACT_PATH.
- Linux and macOs
- Windows
export CONTRACT_PATH=$(find ~+ . -path "*patched*" | head -n 1)
aelf-deploy -a $WALLET_ADDRESS -p $WALLET_PASSWORD -c $CONTRACT_PATH -e https://tdvw-test-node.aelf.io/
$CONTRACT_PATH = Get-ChildItem -Recurse -Filter "*patched*" | Select-Object -First 1 -ExpandProperty FullName
$env:CONTRACT_PATH = $CONTRACT_PATH
aelf-deploy -a $env:WALLET_ADDRESS -p $env:WALLET_PASSWORD -c $env:CONTRACT_PATH -e https://tdvw-test-node.aelf.io/
-
Please wait for approximately 1 to 2 minutes. If the deployment is successful, it will provide you with the contract address.
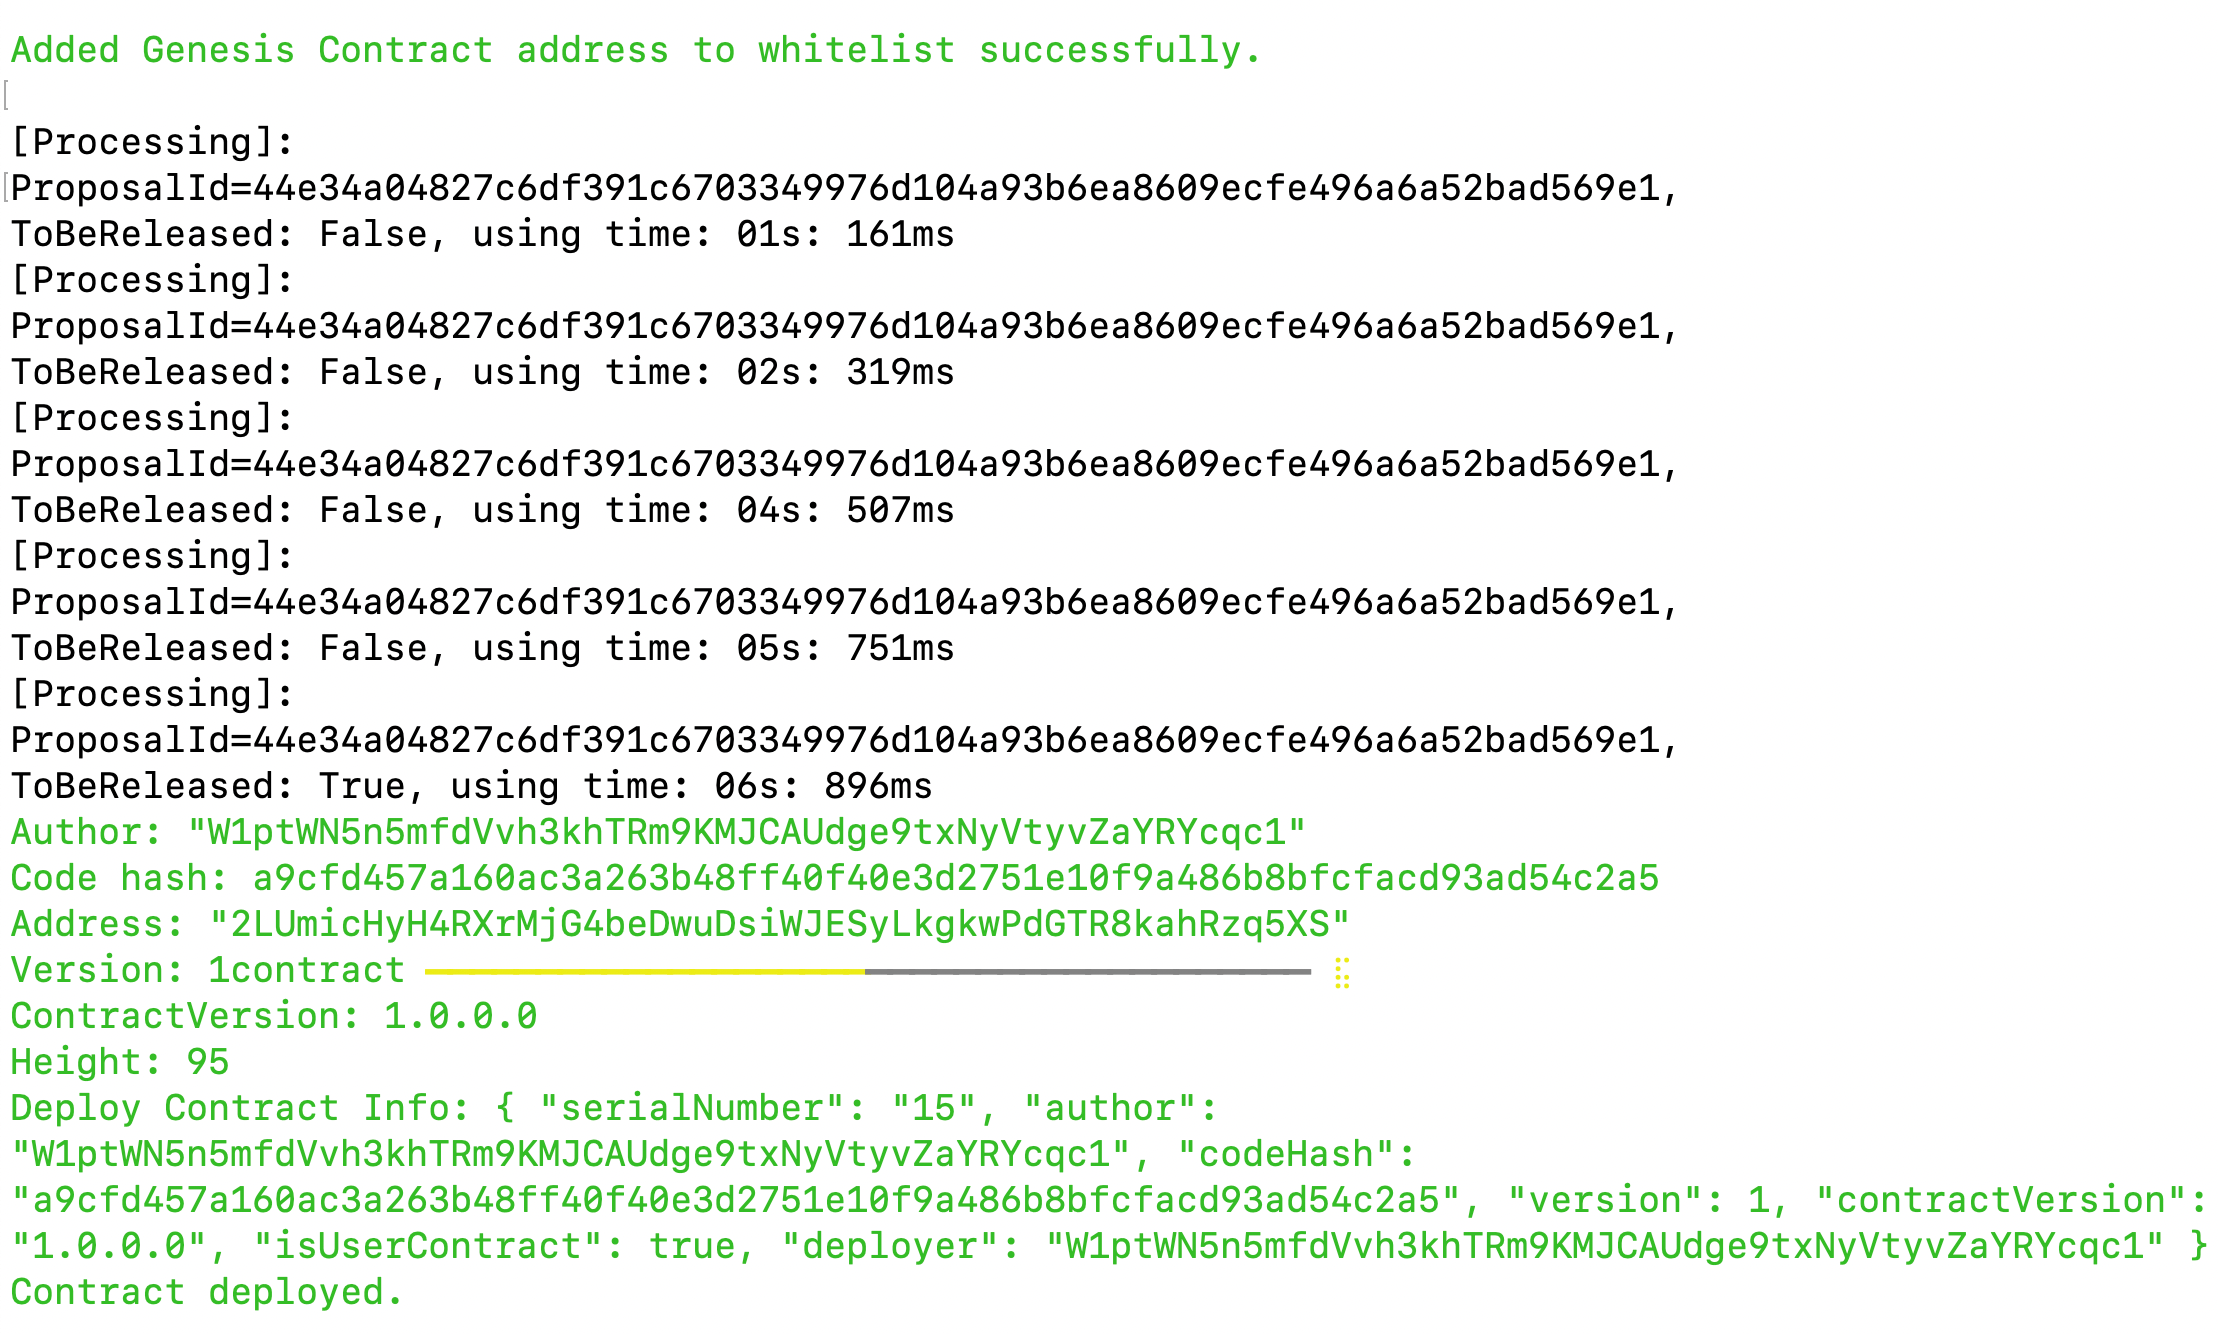
-
Copy the smart contract address from the
addressfield
-
Export your smart contract address:
- Linux and macOs
- Windows
export CONTRACT_ADDRESS="YOUR_SMART_CONTRACT_ADDRESS e.g. 2LUmicHyH4RXrMjG4beDwuDsiWJESyLkgkwPdGTR8kahRzq5XS"
$env:CONTRACT_ADDRESS="YOUR_SMART_CONTRACT_ADDRESS e.g. 2LUmicHyH4RXrMjG4beDwuDsiWJESyLkgkwPdGTR8kahRzq5XS"
ℹ️ Note: You are to copy the smart contract address as we will be referencing it in the next steps!
🎉 You have successfully deployed your Expense Tracker dApp smart contract on the aelf testnet! In the next steps, we will be building the frontend components that allow us to interact with our deployed smart contract!
Step 4 - Interact with Your Deployed Smart Contract through dApp
Project Setup
Let's start by cloning the frontend project repository from github.
git clone https://github.com/AElfProject/aelf-samples.git
- Next, navigate to the frontend project directory with this command:
cd aelf-samples/expense-tracker/2-dapp
- Once you're inside the
2-dappdirectory, open the project with your preferred IDE (e.g., VSCode). You should see the project structure as shown below.
Install necessary libraries
- Run this command in the terminal to install all necessary packages and libraries:
npm install
We are now ready to build the frontend components of our Expense-Tracker dApp.
Configure Portkey Provider & Write Connect Wallet Function
Now, we'll set up our Portkey wallet provider to allow users to connect their Portkey wallets to the dApp and interact with the smart contract. We'll be interacting with the already deployed Expense Tracker smart contract for this tutorial.
Step 1. Locate the File:
- Go to the
src/hooks/useExpenseTrackerSmartContract.tsfile.
Step 2. Fetch the Smart Contract:
-
Find the comment
//Step A - Function to fetch a smart contract based on deployed wallet address -
Replace the existing
fetchContractfunction with this updated code:
//Step A - Function to fetch a smart contract based on deployed wallet address
const fetchContract = async () => {
  if (!provider) return null;

  try {
    // 1. get the aelf dAppChain using provider.getChain
    const chain = await provider?.getChain("tDVW");
    if (!chain) throw new Error("No chain");

    //Address of Expense Tracker Smart Contract
    //Replace with Address of Deployed Smart Contract
    const address = "your_deployed_expense_tracker_contract_address";

    // 2. get the Expense Tracker contract
    const contract = chain?.getContract(address);
    setSmartContract(contract);
  } catch (error) {
    console.log(error, "====error");
  }
};
ℹ️ Note: You are to replace the address placeholder with your deployed Expense Tracker smart contract address from "Deploy Smart Contract" step!
example: Replace with Address of Deployed Smart Contract
const address = "your_deployed_expense_tracker_contract_address";
Explanation:
-
fetchContractFunction: This function fetches a smart contract based on the given chain symbol (e.g., "AELF" or "tDVW") and the contract address.- Check Provider : If no provider is available, the function returns null.
- Fetch Chain : The function fetches chain information using the provider.
- Get Contract : It retrieves the smart contract instance from the chain.
AELF represents the mainnet chain and tDVW represents the testnet chain respectively on the aelf blockchain.
Step 3. Initialize and Fetch the Smart Contracts:
-
Find the comment
// Step B - Effect hook to initialize and fetch the smart contract when the provider changes. -
Replace the existing
useEffecthook with this updated code:
// Step B -  Effect hook to initialize and fetch the smart contract when the provider changes
useEffect(() => {
  fetchContract();
}, [provider]); // Dependency array ensures this runs when the provider changes
Explanation:
useEffectHook : This hook initializes and fetches the smart contracts when the provider changes.- Check Provider : If no provider is available, the function returns null.
- Fetch Contracts : It fetches and sets the smart contracts.
By following these steps, we'll configure the Portkey provider to connect users' wallets to our app and interact with the Expense Tracker smart contract which includes the tracking and management of expenses functionalities. This setup will enable our frontend components to perform actions like addNewExpense , updateExpense , deleteExpense and getExpenseData etc.
Configure Connect Wallet Function
Step 1: Locate the File
- Go to the
src/components/layout/header/index.tsxfile.
Step 2: Write the Connect Wallet Function
-
The
header/index.tsxfile is the header of our Expense Tracker dApp. It allows users to connect their Portkey wallet with the Expense Tracker dApp. -
Before users can interact with the smart contract, we need to write the
Connect Walletfunction. -
Find the comment
// Step C - Connect Portkey Wallet. -
Replace the existing
connectfunction with this code snippet:
const connect = async (walletProvider?: IPortkeyProvider) => {
  // Step C - Connect Portkey Wallet
  const accounts = await (walletProvider ? walletProvider : provider)?.request({
    method: MethodsBase.REQUEST_ACCOUNTS,
  });
  const account = accounts?.AELF && accounts?.AELF[0];
  if (account) {
    setCurrentWalletAddress(account.replace(/^ELF_/, "").replace(/_AELF$/, ""));
    setIsConnected(true);
  }
  !walletProvider && toast.success("Successfully connected");
};
Explanation:
connectFunction : This function connects the user's Portkey wallet with the dApp.- Fetch Accounts : It fetches the wallet accounts using the provider.
- Log Accounts : Logs the accounts to the console for debugging.
- Set Wallet Address : Sets the current wallet address state variable with the fetched account.
In this code, we fetch the Portkey wallet account using the provider and update the wallet address state variable. An alert notifies the user that their wallet is successfully connected.
With the connect wallet function defined, we're ready to write the remaining functions in the next steps.
Configure Create Expense Form
Step 1: Locate the File
- Go to the
src/pages/home/index.tsxfile. This file contains all the functionalities like show user's Expense, AddExpense, UpdateExpense, DeleteExpense, etc.
Step 2: Prepare Form to Add and Update Expenses
-
Find the comment
// Step D - Configure Expense Form. -
Replace the form variable with this code snippet:
// Step D - Configure Expense Form
const form = useForm<z.infer<typeof formSchema>>({
  resolver: zodResolver(formSchema),
  defaultValues: {
    description: "",
    amount: "",
  },
});
Here's what the function does:
-
Initializes a new form variable with default values needed to add a new expense.
-
Fields include:
descriptionandamount.
Now the form is ready for users to fill in the necessary details.
Check Contract Initialization
Step 1: Locate the File
- Go to the
src/pages/home/index.tsxfile. This file contains all the functionalities likecheckIsContractInitialized,initializeContract,addNewExpense,updateExpense,deleteExpenseandgetExpenseData.
Step 2: Prepare a Function to Check Whether the Contract is Initialized or not
-
Scroll down to find the comment
// step 1 - Check If Contract is Initialized or not. -
Replace the existing
checkIsContractInitializedfunction with this code snippet:
// step 1 - Check If Contract is Initialized or not
const checkIsContractInitialized = async () => {
  const result = await smartContract?.callViewMethod("GetInitialStatus", ""); // Call the GetInitialStatus method which is present on Smart Contract
  setIsContractInitialized(result?.data?.value); // Expect value True if it's Initialized otherwise NULL if it's not
};
Initialize Contract
-
Scroll down to find the comment
// step 2 - Initialize the smart contract. -
Replace the existing
checkIsContractInitializedfunction with this code snippet:
// step 2 - Initialize the smart contract
const initializeContract = async () => {
  let initializeLoadingId;
  try {
    // Start Loading
    initializeLoadingId = toast.loading("Initializing a Contract..");

    await smartContract?.callSendMethod(
      "Initialize", // Function Name
      currentWalletAddress as string, // User Wallet Address
      {} // No Arguments
    );

    // Update Loading Message with Success
    toast.update(initializeLoadingId, {
      render: "Contract Successfully Initialized",
      type: "success",
      isLoading: false,
    });

    return;
  } catch (error: any) {

    // Update Loading Message with Error
    toast.update(initializeLoadingId as Id, {
      render: error.message,
      type: "error",
      isLoading: false,
    });
    return;
  } finally {
    // Remove Loading Message
    removeNotification(initializeLoadingId as Id);
  }
};
Add New Expense
-
Write the function to add a new expense.
-
Find the comment
// step 3 - Add a New Expense using Smart Contract. -
Replace the existing
addNewExpensefunction with this code snippet:
// step 3 - Add a New Expense using Smart Contract
const addNewExpense = async (values: {
  description: string;
  amount: string;
}) => {
  let addLoadingId;
  try {
    // Start Loading
    addLoadingId = toast.loading("Adding a New Expense..");
    setFormLoading(true);

    // Prepare Arguments for Create a New Expense
    const sendData = {
      description: values.description,
      amount: values.amount,
      category: selectedCategory?.value,
      currency: "USD",
    };

    // Call AddExpense Function of Smart Contract
    await smartContract?.callSendMethod(
      "AddExpense",
      currentWalletAddress as string,
      sendData
    );

    // Update Loading Message with Success
    toast.update(addLoadingId, {
      render: "New Expense Successfully Adding",
      type: "success",
      isLoading: false,
    });

    // Get New Data from Contract
    getExpenseData();
  } catch (error: any) {
    // Update Loading Message with Error
    toast.update(addLoadingId as Id, {
      render: error.message,
      type: "error",
      isLoading: false,
    });

  } finally {
    // Close Form Modal
    handleCloseModal();
    // Remove Loading Message
    removeNotification(addLoadingId as Id);
    setFormLoading(false);
  }
};
What This Function Does:
- Calls Smart Contract Method : It interacts with the aelf blockchain's smart contract to add a new Expense using
AddExpenseFunction.
Next, we'll write the Update Expense function.
Update Expense
Write the function to update a selected expense.
-
Scroll down to find the comment
// step 4 - Update the Expense. -
Replace the existing
updateExpensefunction with this code snippet:
// step 4 - Update the Expense
const updateExpense = async (values: {
  description: string;
  amount: string;
}) => {
  let updateLoadingId;
  try {
    // Start Loading
    updateLoadingId = toast.loading("Updating a Expense..");
    setFormLoading(true);

    // Prepare Arguments for Update the Expense
    const sendData = {
      expenseId: updateId,
      description: values.description,
      amount: values.amount,
      category: selectedCategory?.value,
      currency: "USD",
    };

    // Call UpdateExpense Function of Smart Contract
    await smartContract?.callSendMethod(
      "UpdateExpense",
      currentWalletAddress as string,
      sendData
    );

    // Update Loading Message with Success
    toast.update(updateLoadingId, {
      render: "Expense Successfully Updated",
      type: "success",
      isLoading: false,
    });

    // Get New Data from Contract
    getExpenseData();
  } catch (error: any) {
    // Update Loading Message with Error
    toast.update(updateLoadingId as Id, {
      render: error.message,
      type: "error",
      isLoading: false,
    });
  } finally {
    // Close Form Modal
    handleCloseModal();
    // Remove Loading Message
    removeNotification(updateLoadingId as Id);
    setFormLoading(false);
  }
};
What This Function Does:
-
Calls Smart Contract Method : It interacts with the blockchain smart contract to Update the existing expense using
UpdateExpensefunction. -
Get New Data from Contract : It calls the
getExpenseDatafunction to get updated data from the smart contract.
Next, we'll write the Delete Expense function.
Delete Expense
Write the Function to delete an existing expense.
-
Scroll down to find the comment
// step 5 - Delete the Expense. -
Replace the existing
deleteExpensefunction with the following code snippet:
// step 5 - Delete the Expense
const deleteExpense = async (data: IExpenseObject) => {
  let deleteLoadingId;
  try {
    // Start Loading
    deleteLoadingId = toast.loading("Removing a Expense..");
    setDeletingId(data.expenseId); // set Deleting Id for Loading on Button

    // Call DeleteExpense Function of Smart Contract for Delete the Expense
    await smartContract?.callSendMethod(
      "DeleteExpense",
      currentWalletAddress as string,
      { value: data.expenseId }
    );

    // Update Loading Message with Success
    toast.update(deleteLoadingId, {
      render: "Expense Successfully Removed",
      type: "success",
      isLoading: false,
    });

    // Get New Data from Contract
    await getExpenseData();
  } catch (error: any) {
    // Update Loading Message with Error
    toast.update(deleteLoadingId as Id, {
      render: error.message,
      type: "error",
      isLoading: false,
    });
  } finally {
    setDeletingId(null);
    // Remove Loading Message
    removeNotification(deleteLoadingId as Id);
  }
};
What This Function Does:
-
Calls Smart Contract Method : It interacts with the blockchain smart contract to delete an existing expense using the
DeleteExpensefunction. -
Get New Data from Contract : It calls the
getExpenseDatafunction to get updated data from the smart contract.
Next, we'll write the Handle Submit Form function.
Handle Submit Form
Write a function to make the move.
-
Scroll down to find the comment
// step 6 - Handle Submit Form. -
Replace the existing
onSubmitfunction with this code snippet:
// step 6 - Handle Submit Form
const onSubmit = async (values: { description: string, amount: string }) => {
  // Check Whether Contract Initialized or not
  if (isContractInitialized !== true) {
    await initializeContract(); // initialize the contract if it's not initialized before
  }

  // Check Whether Form is for Create or Update the Expense
  if (!!updateId) {
    await updateExpense(values); // Call updateExpense for Update the Expense
  } else {
    await addNewExpense(values); // Call updateExpense for Create a new Expense
  }
};
What This Function Does:
-
Check initialized contract: It checks whether the smart contract is initialized or not by using
initializeContractfunction. -
Update Expense: Call the
updateExpensefunction if updatedId has any value. -
Add Expense: Call the
addNewExpensefunction if updatedId does not have any value.
Here, we have completed functions to Add Expense, Update Expense and Delete Expense and now it's time to write a function to Fetch Expense from the smart contract.
Fetch All Expenses
-
Scroll up to find the comment
// step 7 - Fetch All Expenses. -
Replace the existing
getExpenseDatafunction with this code snippet:
// step 7 - Fetch All Expenses
const getExpenseData = async () => {
  try {
    const result = await smartContract?.callViewMethod("ListExpenses", {
      value: currentWalletAddress,
    });
    console.log("result", result?.data);
    setExpenseData(result?.data ? result?.data.expenses : []);
  } catch (error) {
    console.log("error======", error);
  } finally {
    setLoading(false);
  }
};
Here's what the function does:
- Fetches Expense Data: It calls
ListExpensesto get the list of all expenses from the Expense Tracker smart contract. - Set Expense on State: Get the result data from the smart contract and set an array of all expenses into
expenseDataState.
We have prepared necessary function to fetch all the expenses created from a connected user's wallet.
Now that we've written all the necessary frontend functions and components, we're ready to run the Expense Tracker dApp application in the next step.
Run Application
In this step, we will run the Expense Tracker dApp application.
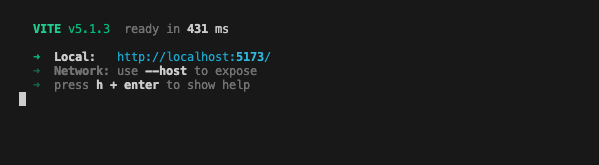
- To begin, run the following command on your terminal.
npm run dev
Note: Ensure that you are running this command under the expense-tracker/2-dapp folder.
-
You should observe the following as shown below.
-
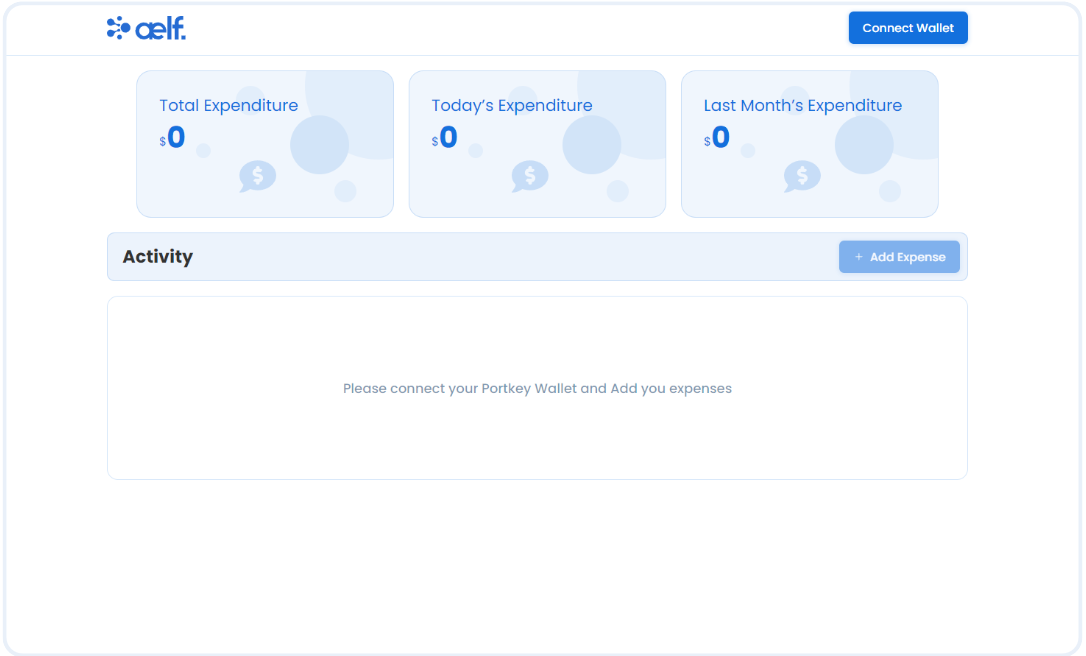
Upon clicking on the localhost URL, you should be directed to the Expense Tracker dApp landing page as shown below.
If you are developing and testing this with github codespace, you can use port forward to test the web server that is running in codespace, here is the link on how to use port forward for codespace https://docs.github.com/en/codespaces/developing-in-a-codespace/forwarding-ports-in-your-codespace
-
Usually codespaces automatically forward ports, you should see a pop-up message at the bottom right of your codespace browser window as shown in the diagram below:
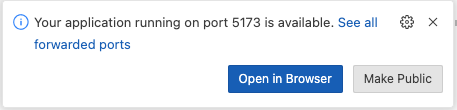
-
Click the link to open the Expense Tracker dApp in the browser.
Create Portkey Wallet
Portkey is the first AA wallet from aelf's ecosystem, migrating users, developers and projects from Web2 to Web3 with DID solution.
Users can swiftly log into Portkey via their Web2 social info with no private keys or mnemonics required. Underpinned by social recovery and decentralized guardian design, Portkey safeguards users' assets from centralized control and theft. Portkey has a unique payment delegation mechanism which enables interested parties to function as delegatees to pay for user activities on users' behalf. This means that users can create accounts for free and fees for other usages may also be covered in Portkey.
Portkey also provides crypto on/off-ramp services, allowing users to exchange fiat with crypto freely. It supports the storage and management of various digital assets such as tokens, NFTs, etc. The compatibility with multi-chains and seamless connection to all kinds of DApps makes Portkey a great way to enter the world of Web3.
With DID solution as its core, Portkey provides both Portkey Wallet and Portkey SDKs.
For more information, you may visit the official documentation for Portkey at https://doc.portkey.finance/.
- Download the Chrome extension for Portkey from https://chromewebstore.google.com/detail/portkey-wallet/iglbgmakmggfkoidiagnhknlndljlolb.
The Portkey extension supports Chrome browser only (for now). Please ensure that you are using Chrome browser. You may download Chrome from https://www.google.com/intl/en_sg/chrome/.
-
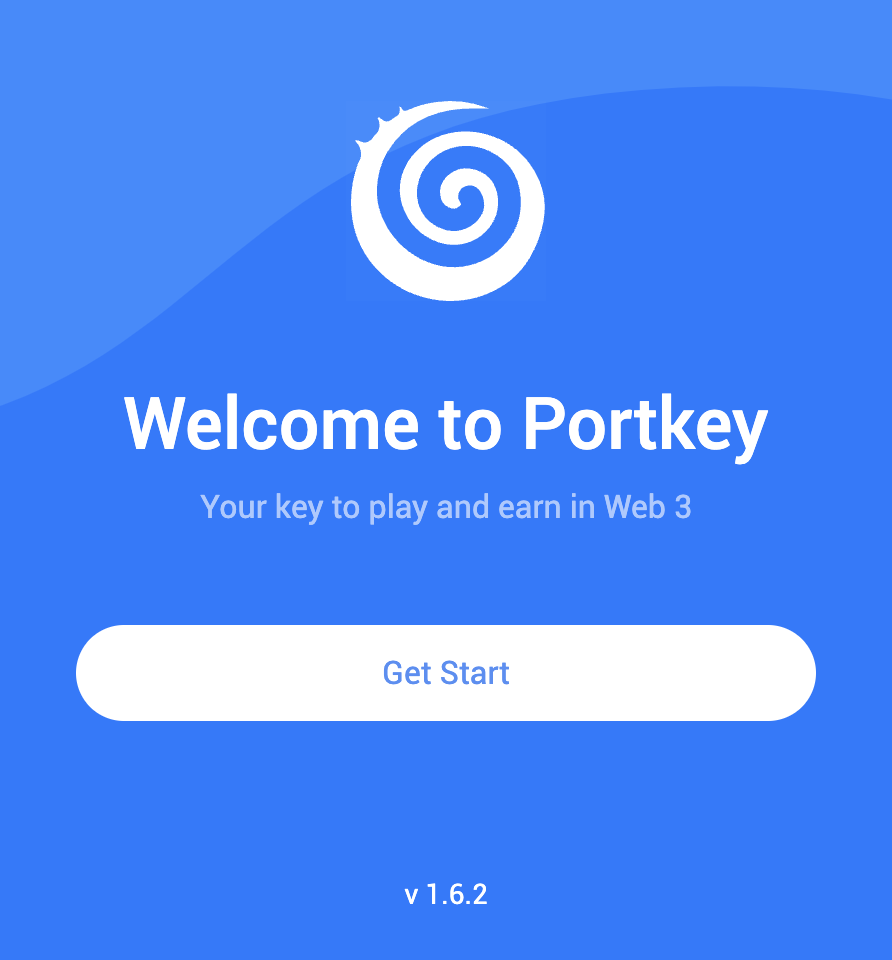
Once you have downloaded the extension, you should see the following on your browser as shown below.
-
Click on
Get Startand you should see the following interface as shown below.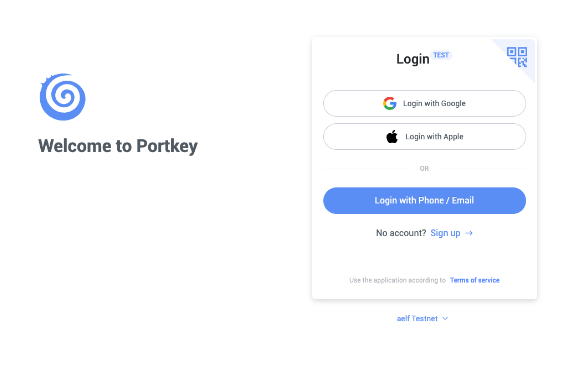
Sign up
-
Switch to aelf Testnet network by selecting it:
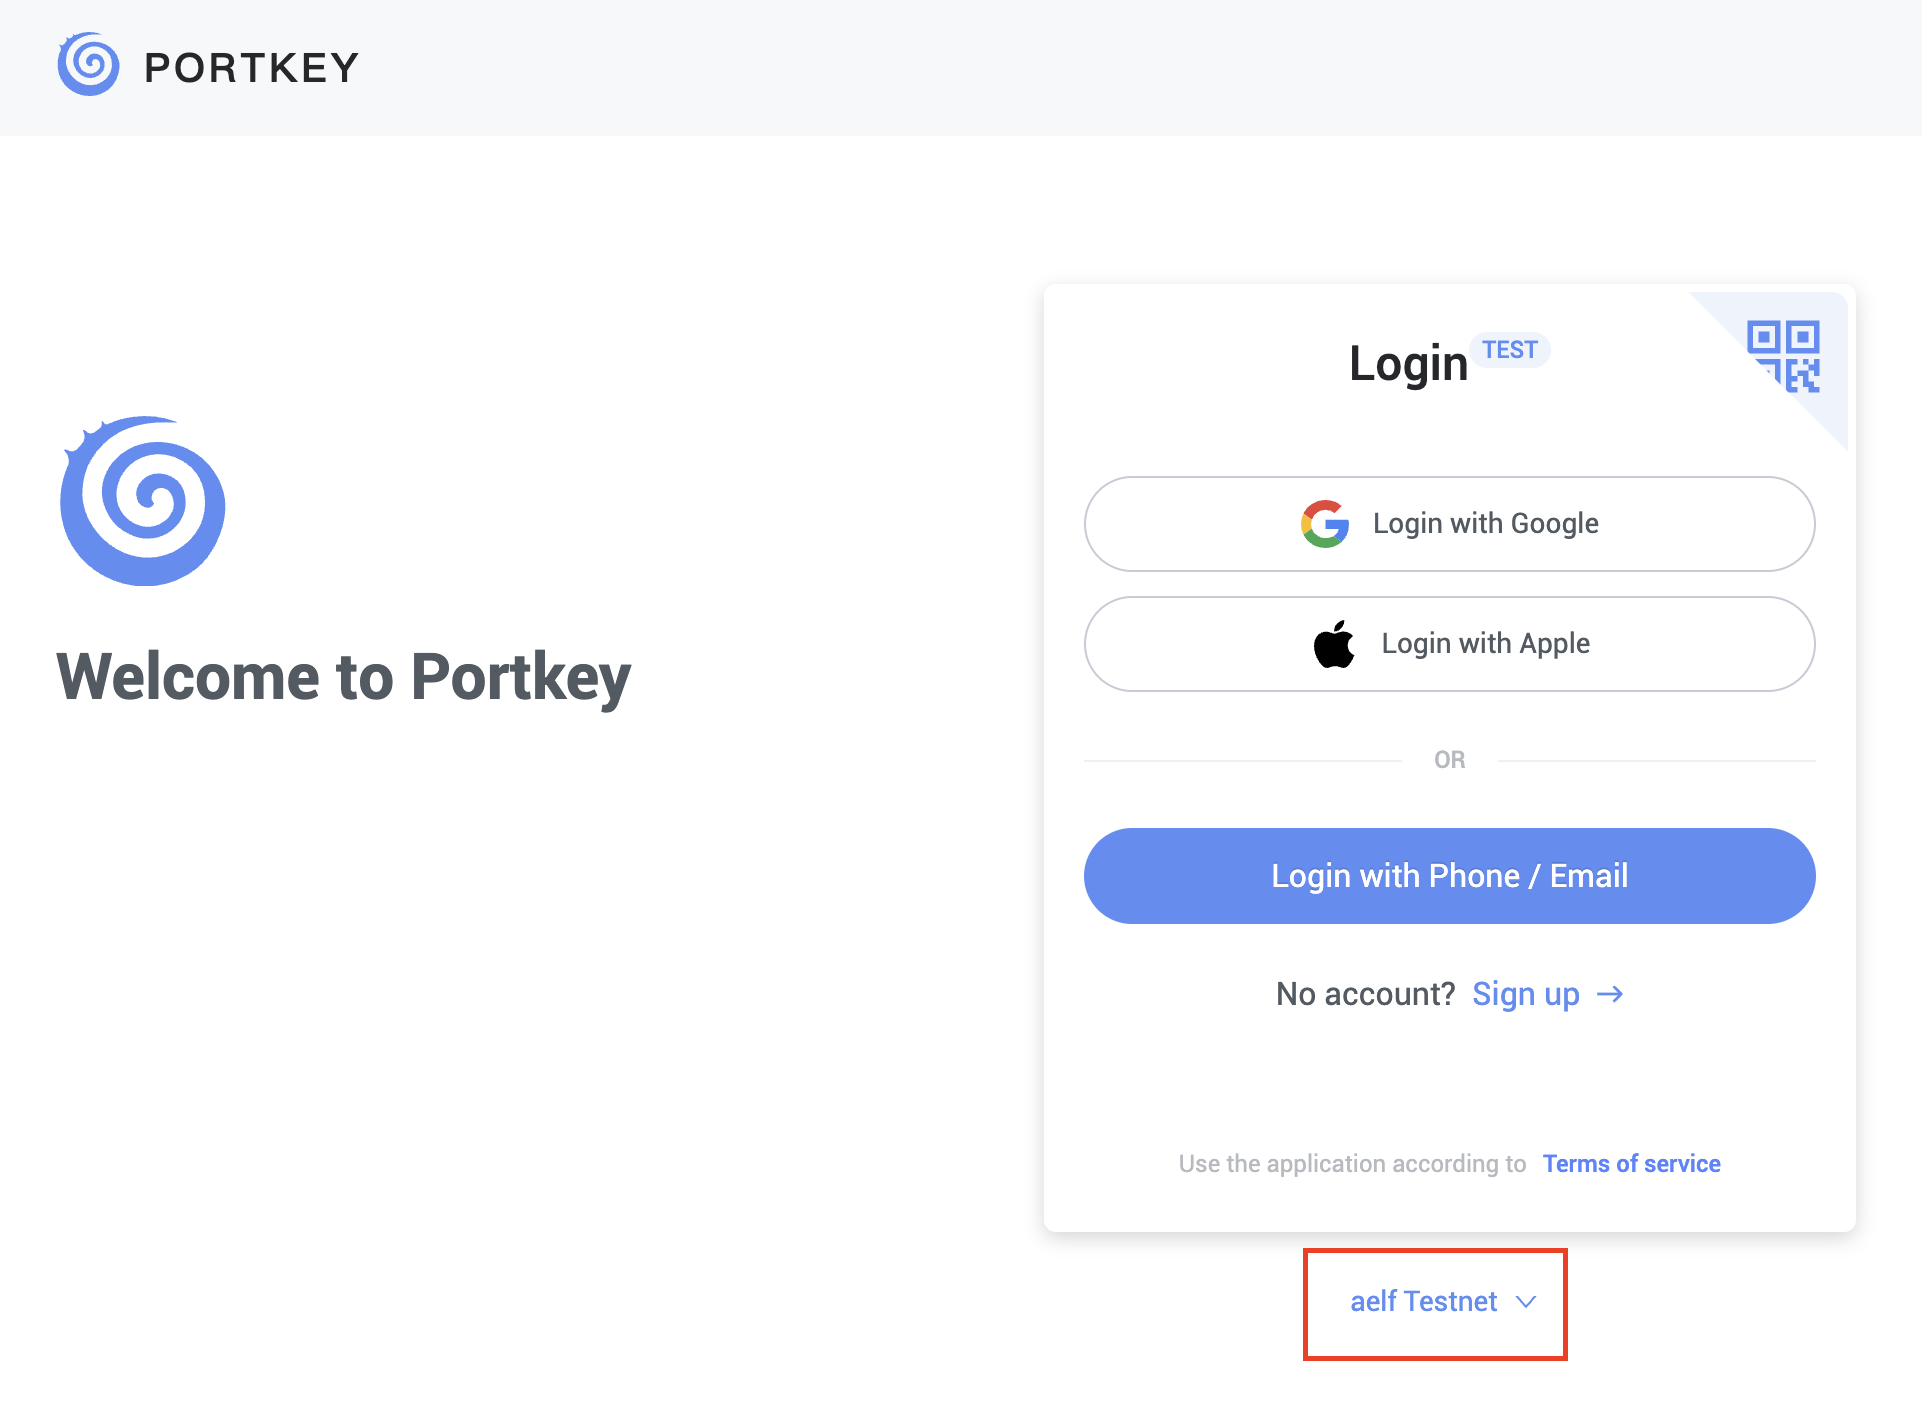
Please make sure you are using aelf Testnet in order to be able to receive your testnet tokens from the Faucet.
-
Proceed to sign up with a Google account or your preferred login method and complete the necessary accounts creation prompts and you should observe the following interface once you have signed up.
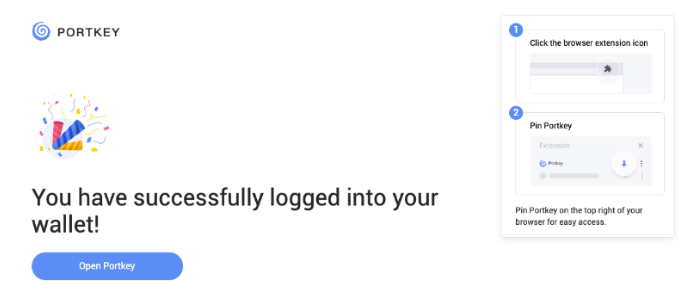
With that, you have successfully created your very first Portkey wallet within seconds. How easy was that?
It is highly recommended to pin the Portkey wallet extension for easier access and navigation to your Portkey wallet!
-
Next, click on ‘Open Portkey’ and you should now observe the following as shown below.
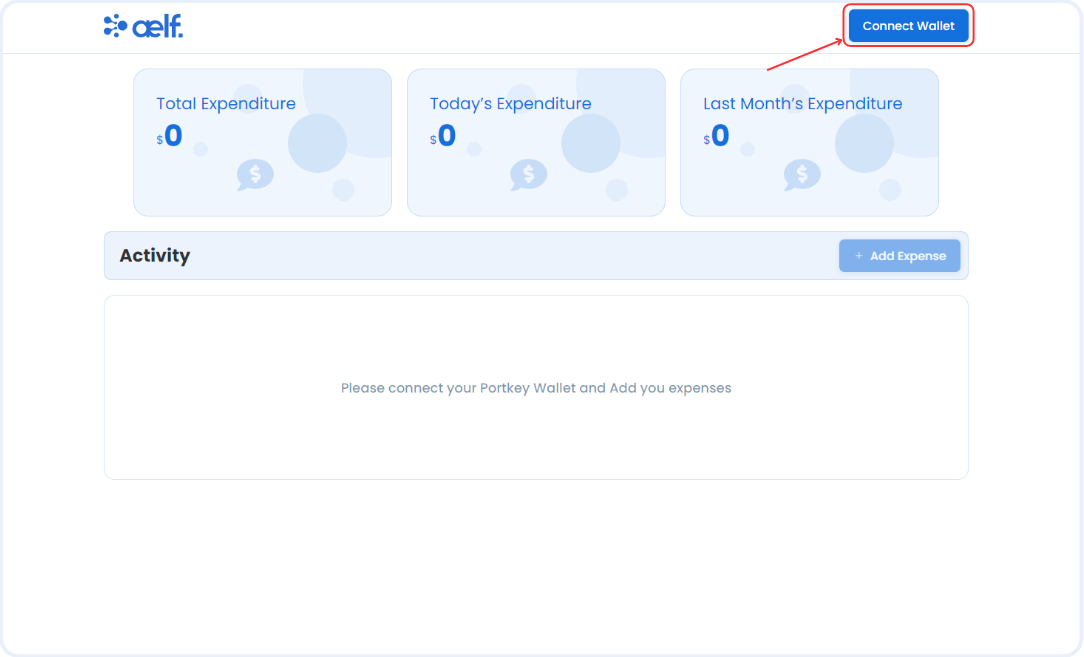
Connect Portkey Wallet
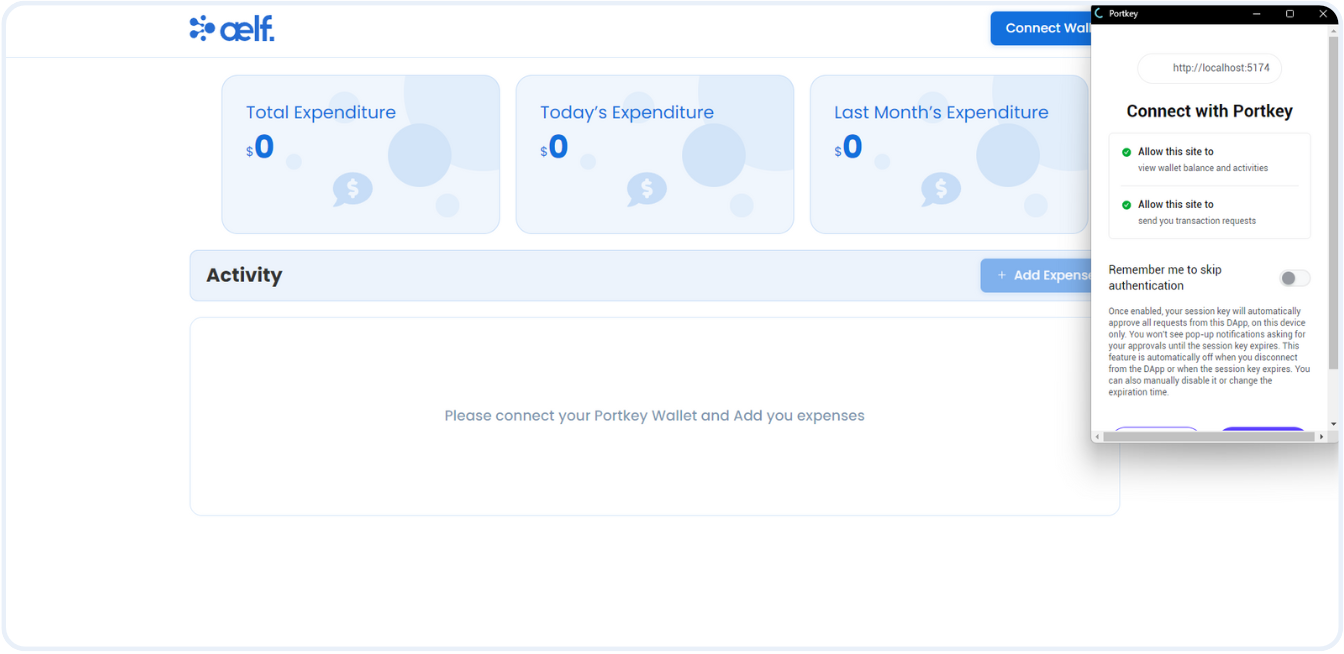
-
Click on "Connect Wallet" to connect your Portkey wallet.
-
You will be get below connect wallet request on your Portkey wallet.
-
Click on Approve button.
-
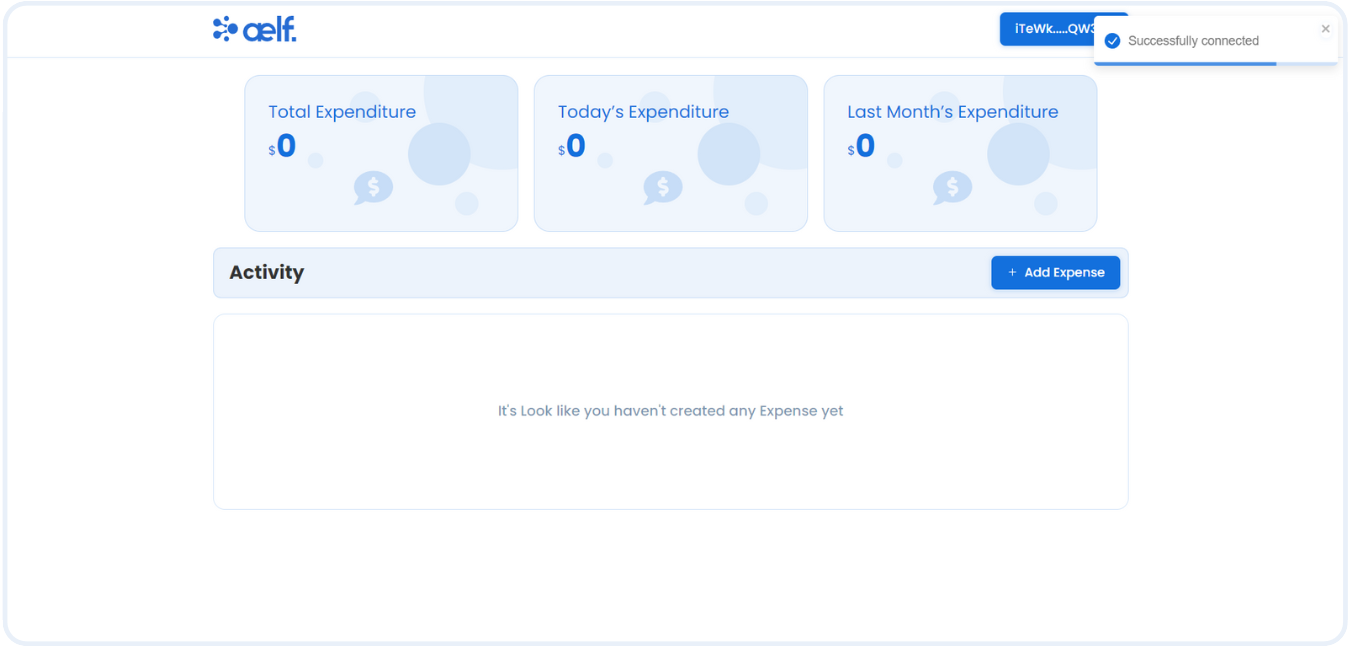
The button will change to "Your Wallet Address" when the connection is successful.
Add New Expense
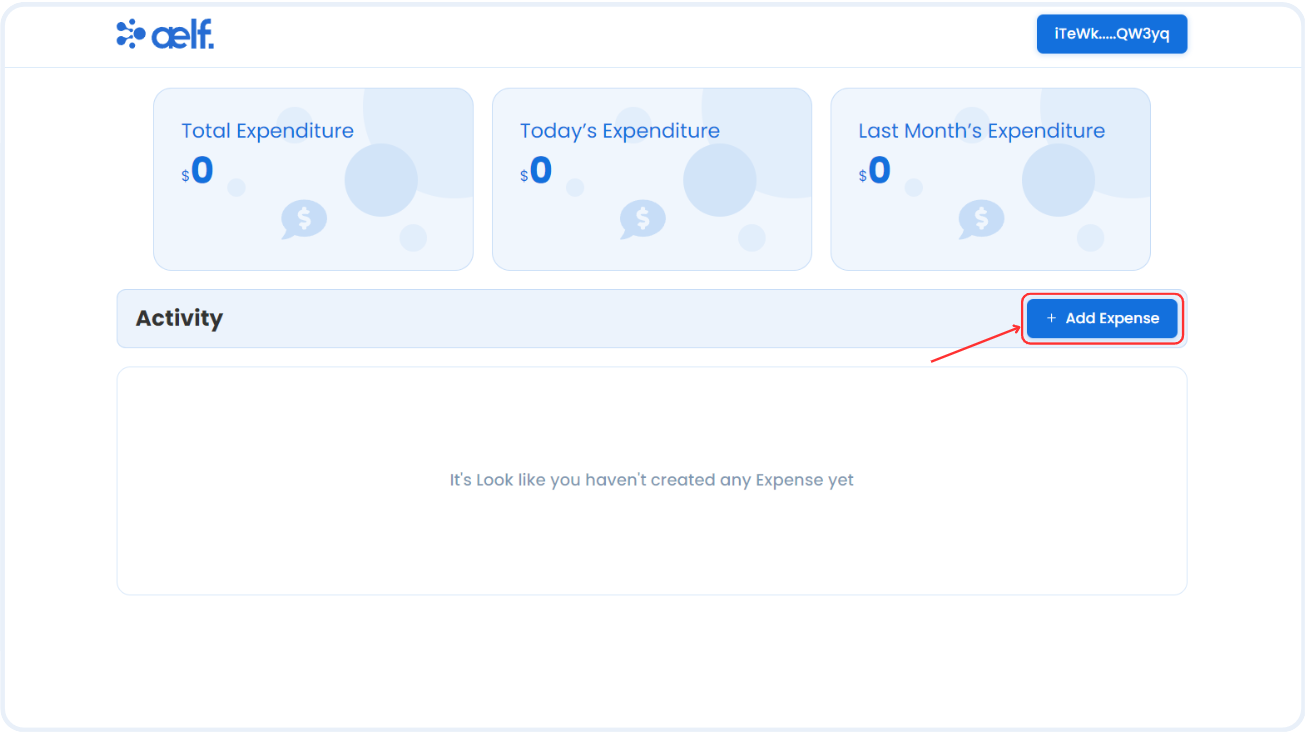
-
Click on "Add Expense" button to add a new expense.
-
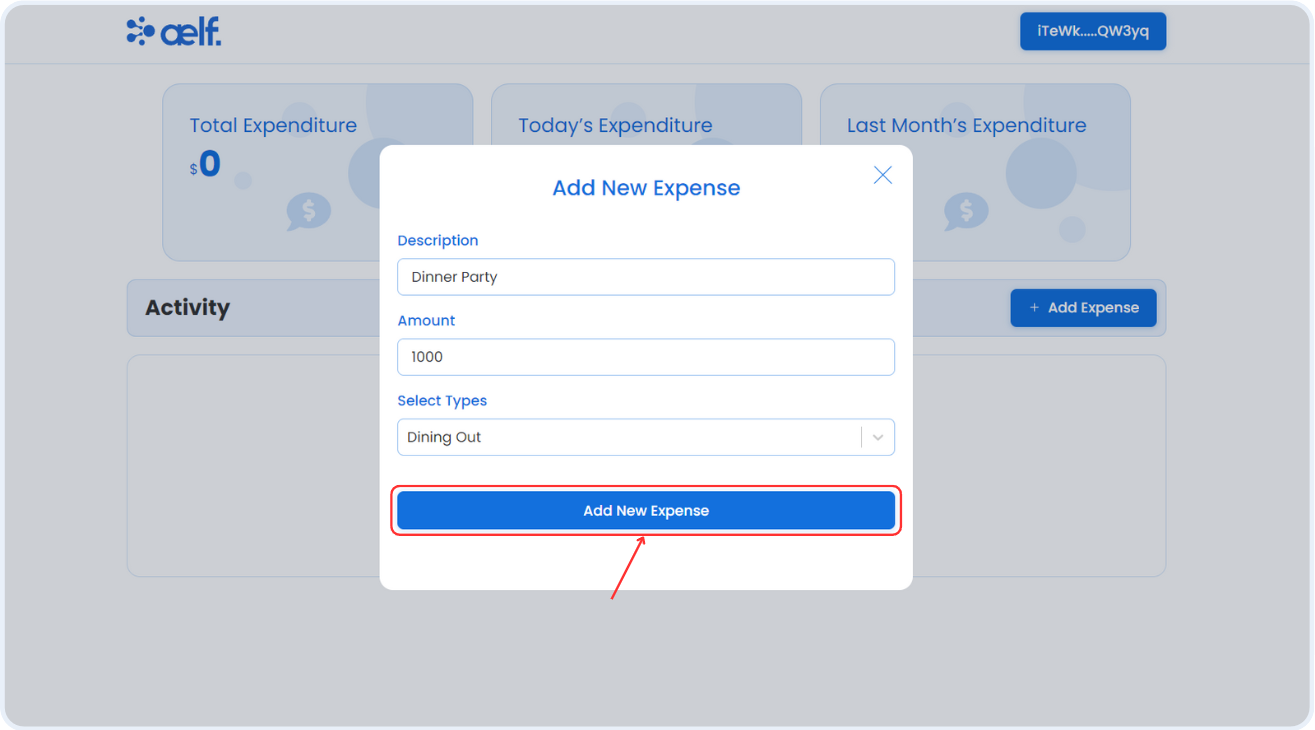
You will see the pop-up modal with form to add a new expense. Please fill all the necessary fields like
Description,AmountandSelect Category.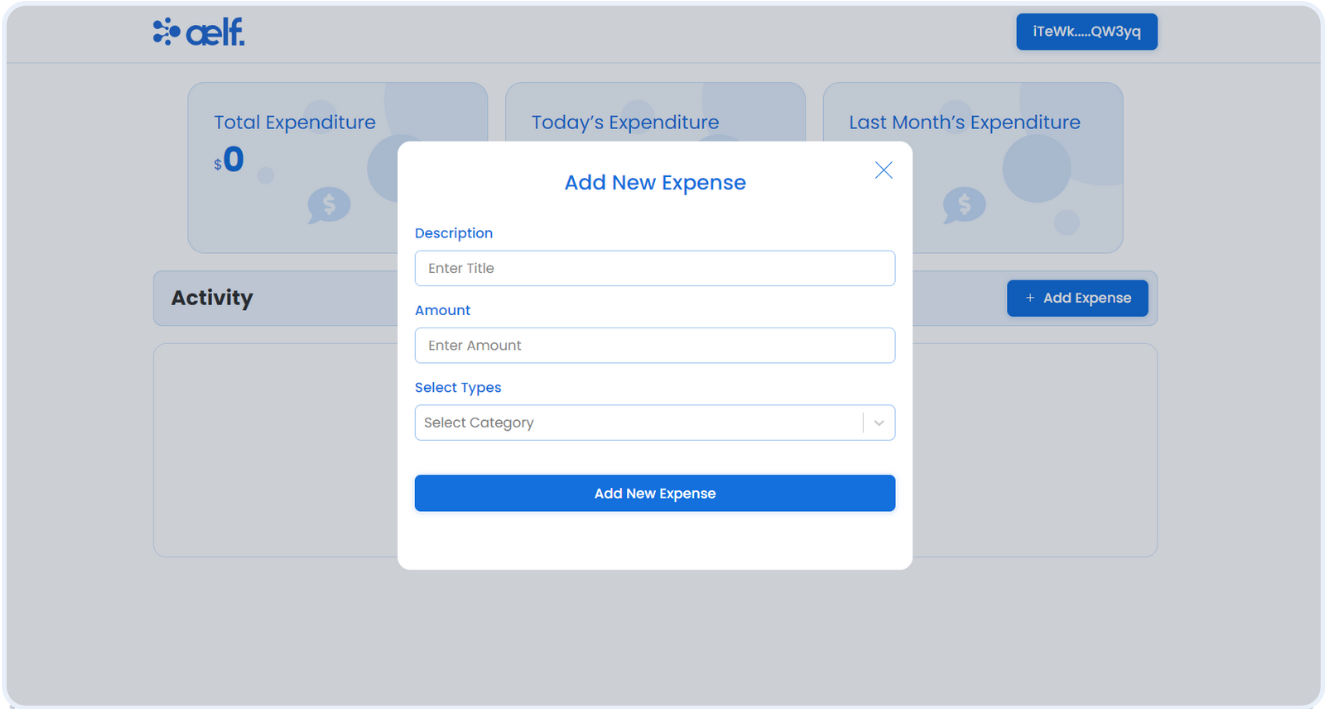
-
Click on Add New Expense button as shown below.
-
You will receive a transaction request on your portkey wallet to Sign the transaction.
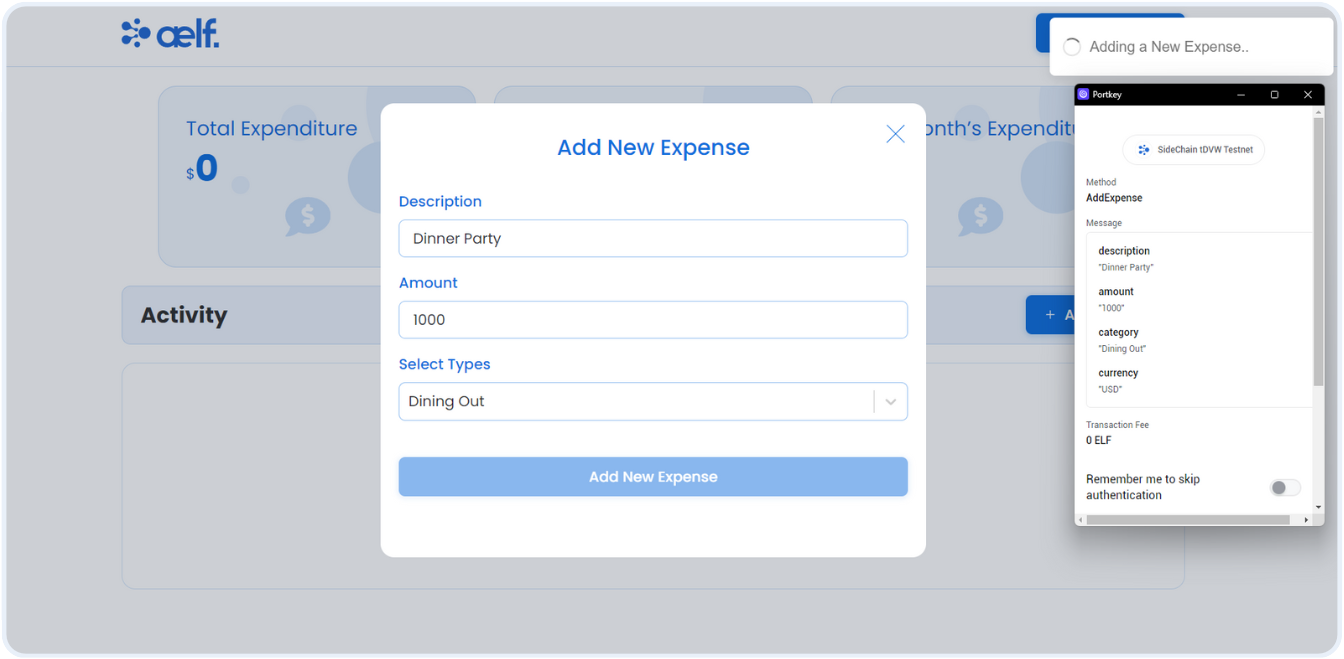
-
Click on Sign the transaction.
-
After the transaction is successfully processed, Your first expense will be added ✅.
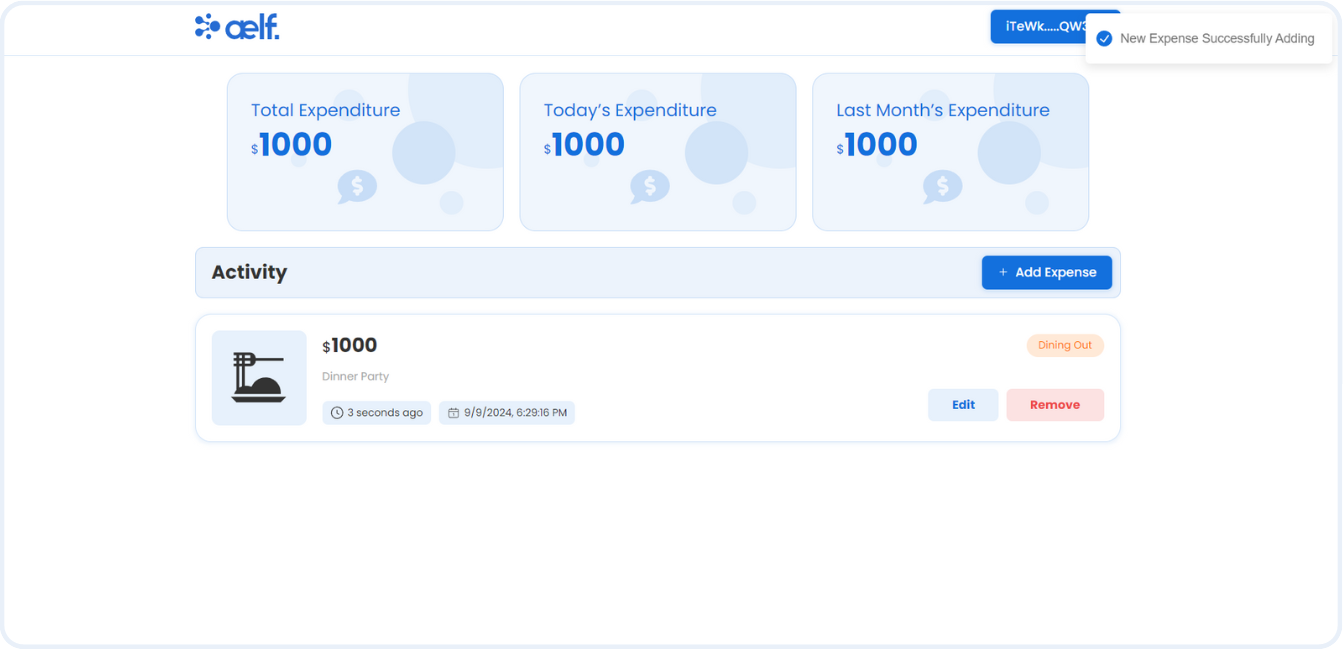
As we have Added an Expense successfully, You will be able to see the expense card and the total Amount of the Outcome.
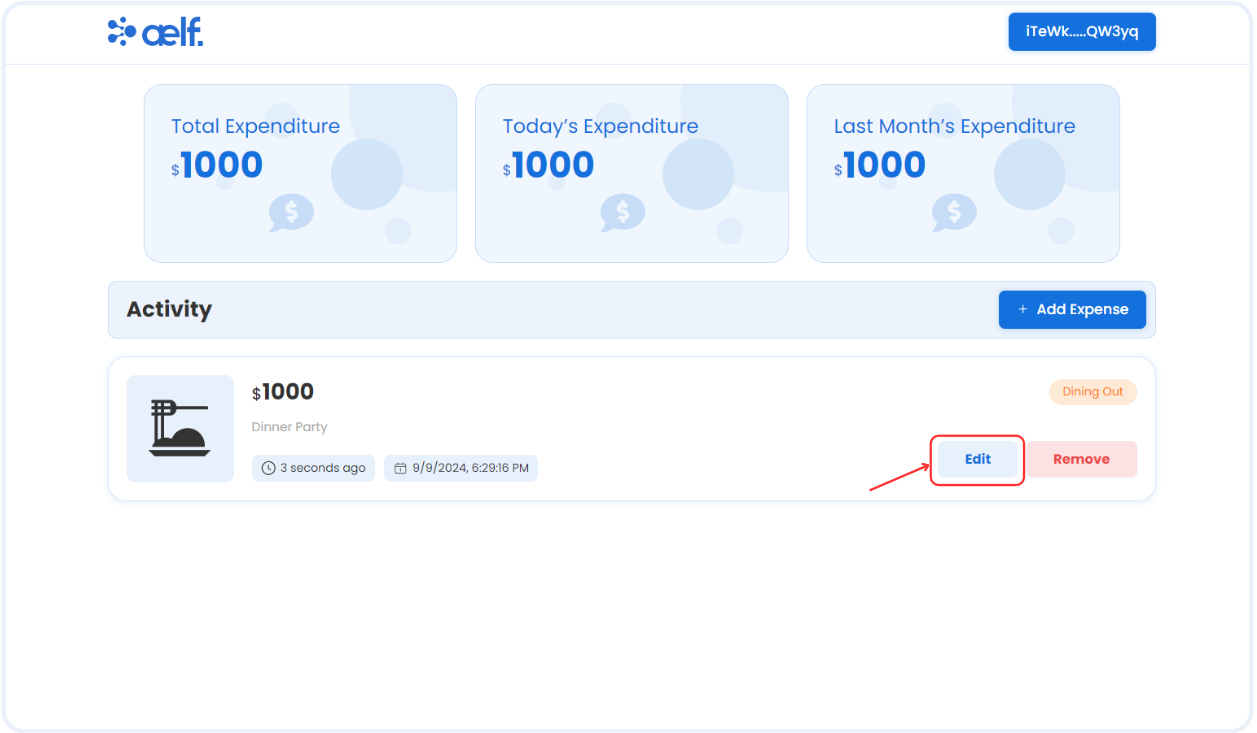
Edit the Expense
-
Click on the "Edit" button to edit a selected expense.
-
You will see the pop-up modal with form to edit the expense. Edit the necessary fields according to your need.
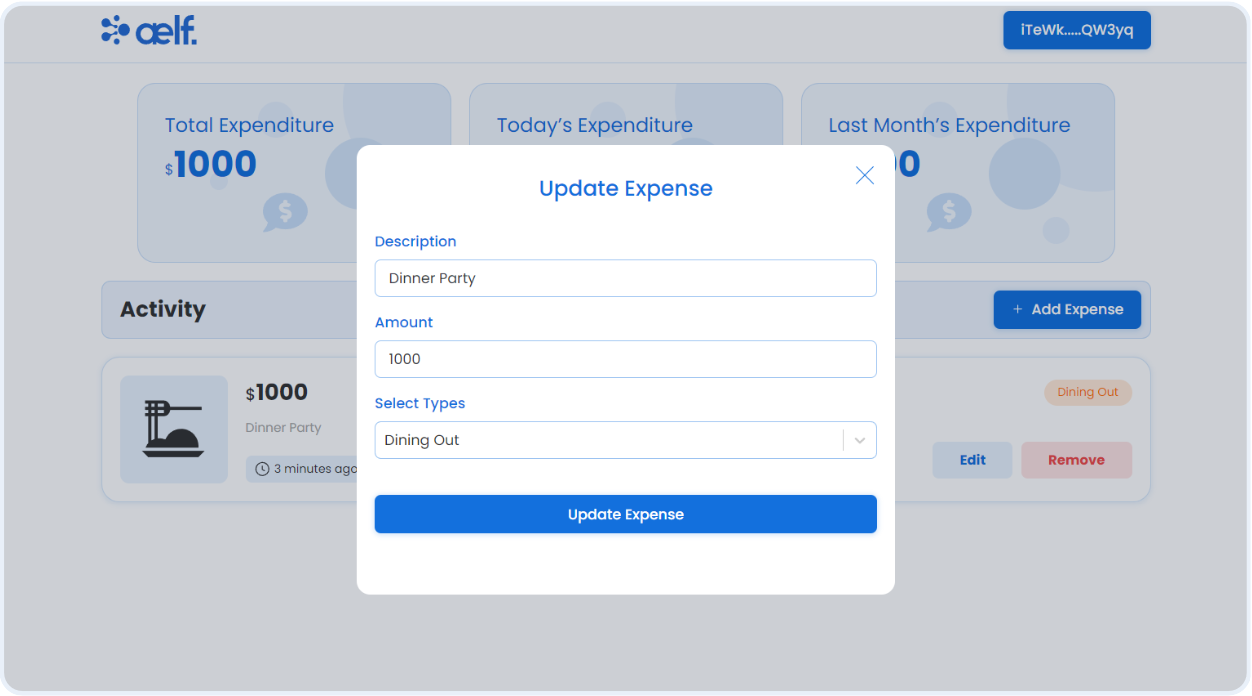
-
Click on Update Expense Button.
-
Now, You will recieve a transaction request on your portkey wallet to Sign the transaction.
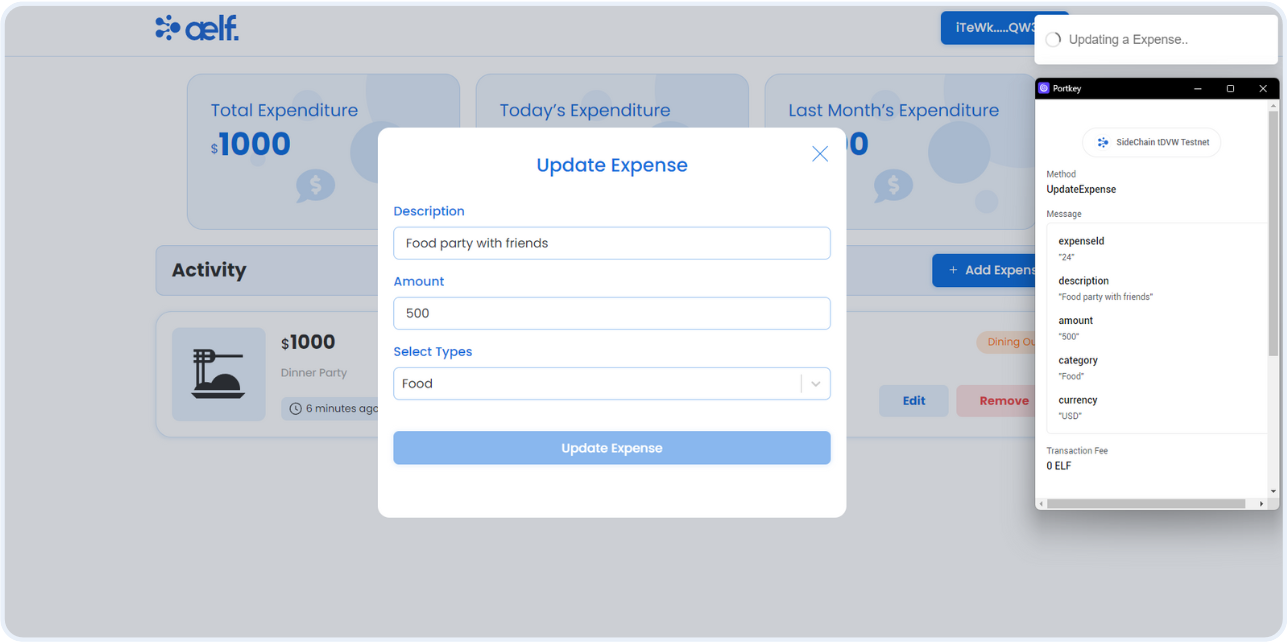
-
Click on Sign the transaction.
-
After the transaction is successfully processed, your expense details will be updated✅.
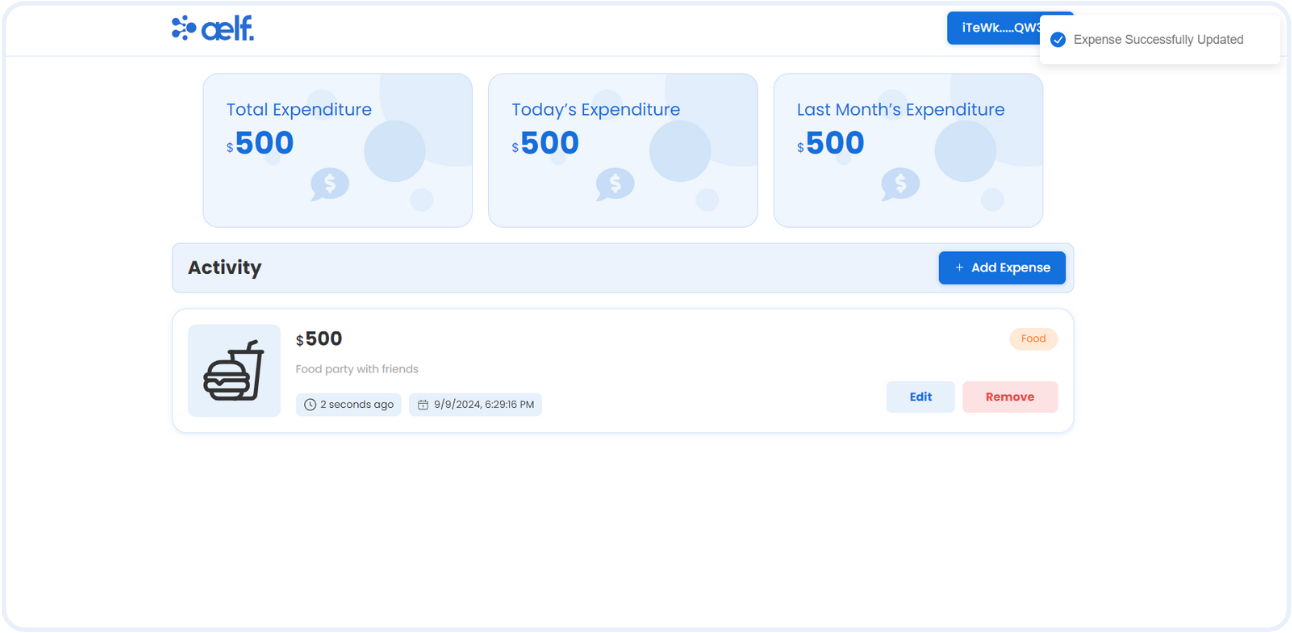
As we have Edited an Expense successfully. Let's test remove expense functionality.
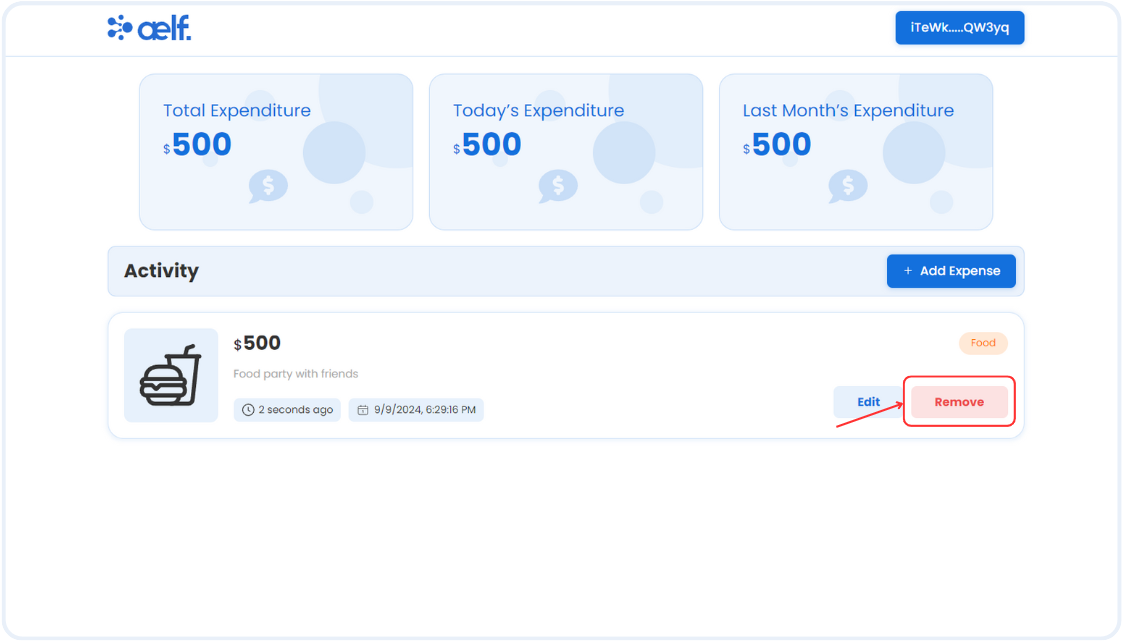
Remove the Expense
-
Click on "Remove" button to remove the selected expense.
-
Now, You will recieve a transaction request on your portkey wallet to Sign the transaction.
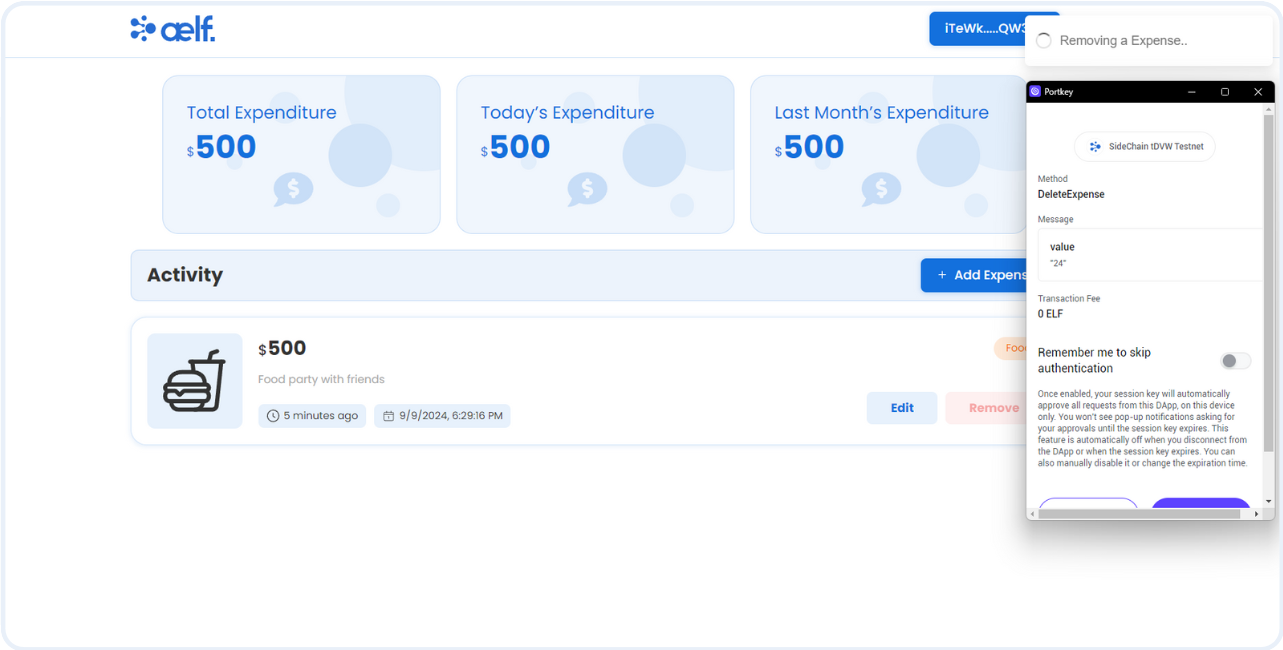
-
Click on Sign the transaction.
-
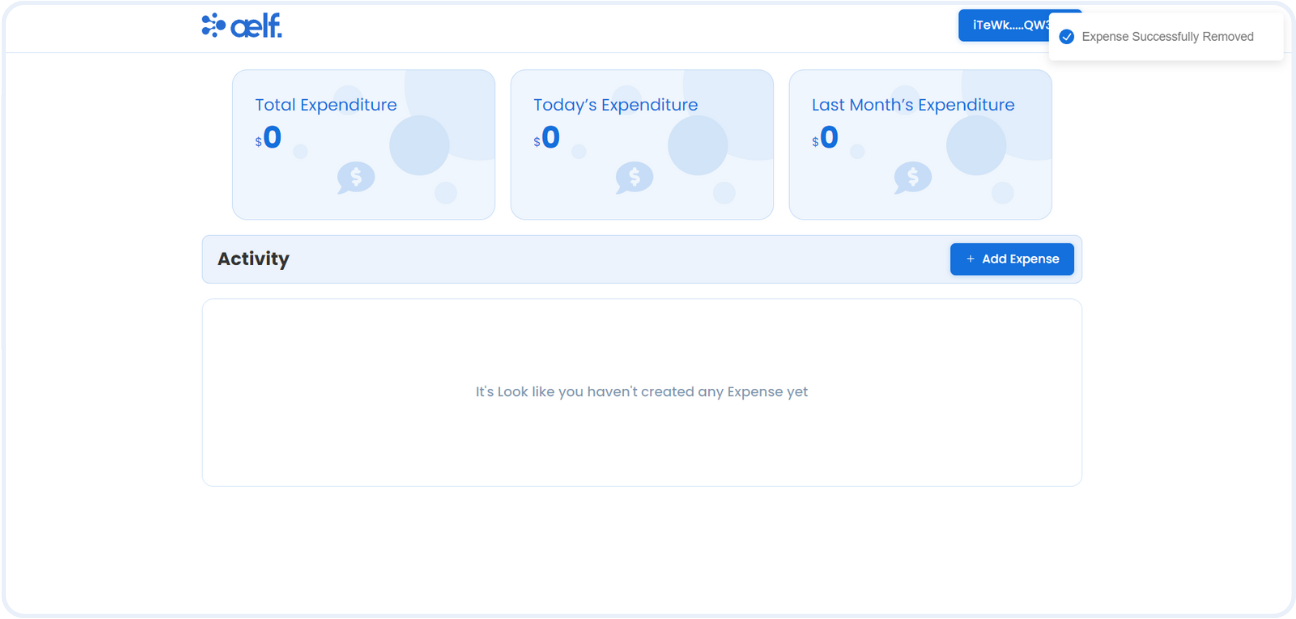
After the transaction is successfully processed, your expense will be removed from the list.
🎉 Congratulations Learners! You have successfully built your Expense Tracker dApp.
🎯 Conclusion
🎉 Congratulations on completing the Expense Tracker dApp tutorial! 🎉 You've accomplished critical milestones, from setting up your development environment to creating, deploying, and interacting with your Expense Tracker smart contract on the aelf blockchain. 🌟
📚 What You've Learned
Throughout this tutorial, you've gained hands-on experience with:
-
🛠️ Setting Up Your Development Environment: You successfully installed and configured all necessary tools to start developing smart contracts on the aelf blockchain.
-
💻 Developing Your Smart Contract: You crafted the essential logic for the Expense Tracker, building a contract to manage tasks like adding, updating, and deleting expenses while keeping a record of all transactions.
-
🚀 Deploying the Smart Contract: You deployed your Expense Tracker contract on the aelf blockchain, ensuring it was live and operational for real-world use.
-
🔧 Interacting with Your Deployed Smart Contract through the dApp: You created a front-end interface, connected it to the blockchain using Portkey, and implemented crucial functions like wallet connectivity, creating new expense, and interacting with expense data.
🔍 Final Output
By now, you should have:
-
📜 A deployed smart contract that governs the logic of managing expenses and storing financial data on the blockchain.
-
💻 A fully functional Expense Tracker dApp where users can securely connect their wallets, create new expenses, update or delete them, and view their financial data — all in a decentralized manner.
➡️ What's Next?
Now that you've built the foundation of your Expense Tracker dApp, consider extending it with advanced features:
-
📊 Add Analytical Features: Implement visualizations and analytics to help users gain better insights into their spending patterns and budgeting habits.
-
🔒 Enhance Security: Strengthen your dApp by applying smart contract security best practices to ensure that users' financial data remains private and secure.
-
🌍 Exploring Cross-Chain Capabilities: Explore aelf’s cross-chain capabilities to integrate your dApp with other blockchain networks and allow users to manage their finances across multiple chains.
You've taken a significant step toward mastering blockchain development with your Expense Tracker dApp. Now, you’re ready to continue innovating and expanding your decentralized applications on the aelf platform. 🚀
Happy coding and expanding your Expense Tracker dApp! 😊